Vendôme pliers pants
Do not be afraid in the name of this tutorial! I know that tongs without patterns seem to be an impossible mission. But, I dug my mening to find a solution. In addition, in this season, we all want hot and comfortable pants to walk the streets of the capital. So hang on to your machines and come and make with me your first tingdy pants without patterns!
You know that regularly on the Saint-Pierre coupons, we receive products from Haute-Couture house. Well today, I show you what it is possible to do with these magnificent materials. Today, it is a chevron effect fabric made up of cotton and silk that will be the star of this article. And I told myself that for the occasion we were going to see things in big ones while keeping them simple. And given the current weather for pants to protect itself from the rain will not be too much!
Supplies :
- 120 cm x 150 cm of Cotton and silk chevron effect fabric
- 1 coil of matching thread
- 1 Invisible zipper 22 cm
- 1 sewing machine
- 1 foot pressure for invisible closure
- 1 Craie tailor
- 1 rule / square
- 1 Pins boxes
- 1 sewing needle
- 1 pair of scissors
- 1 meter measurer
- 1 pants from your wardrobe

For this tutorial, you will need to know 3 of your measurements: your waist, your pool turn and the height of your size to your ankles. This last measure is not compulsory, you can simply base yourself on the length of the pants that you will use to make this tutorial.
Measurement of my model: size tower: 75 cm; Basin tower: 102 cm; Height height of Cheville: 100cm
Step 1: Draw your pieces
1- On your fabric folded in half, draw a rectangle of 29.5 cm (pelvis tower divided by 4 + 4 cm of ease) of width, and 104 cm (your height height of racing + cm of hem value) of length (Diagram 1). On this rectangle, we will draw two pliers on the waist line and a pliers in the side line, they will give a nice curve to your pants.
2- Before drawing your pliers, you must calculate the value of these. Just make a simple calculation: width of your rectangle - 1/4 of your waist. To give you a concrete example here is what this calculation gives when I use the measures of my model:
30 - 19 = 11 Therefore my pliers will have a total value of 11 cm to be distributed over my piece.
3- We will start by tracing your first pliers, it will be taken in the seam on the side. Start by scoring a point 3 cm from the edge on the side, then 20 cm down on the side also and trace a straight line to reach them (2). I only have to distribute 8 cm between my 2 remaining pliers.
4- Mark a point 9 cm from the middle in front of your pants. From this point note the value of your pliers (3). In the middle of this measurement, draw a perpendicular to the size 20 cm long line. And join this point with the ends of the pliers.
5- For your last clip measure the distance between the side of your pieces and the end of the first pliers. The middle of this measure will be the center of the second pliers. All you have to do is repeat the same operation as in step 3 (4).

6- Now place the pants of your wardrobe as presented in the photo. Then draw the outline of your fork line to the point marked in the photo (1).
7- Once this line has been tracked, remove your pants from your fabric. Now draw a line parallel to the length of your rectangle from the end of your fork line (2).

8- All you have to do is cut this piece 4 times, adding 1 cm of sewing value to the sides and the top of your pieces. We have already included the hem values in the length of the pants. To facilitate assembly, I invite you to retrace all your pliers on your pieces, ensuring you to trace them on the inside of your pieces.
At the end of this stage you should end up with 4 songs.
If you have managed to survive all my congratulations to this stage, you have made the hardest. If a step seems unclear, don't hesitate to leave a comment to have more explanations.
Step 2: The assembly
9- We will start by closing the pliers. To do this, fold your pliers in half at the middle line and pin. A tip that I learned to close the pliers, is always starting from the top of it by making a stop point. Then when it happened at the end of it to remove my piece from the machine and make a knots in hand (1). Repeat the same operation for all your pliers and then go outside (2).
10- Assemble the environments of your front and your back with a seam 1 cm from the edge (3). Iron the open seams (4).

11- With one of your freshly assembled pieces, I invite you to replace it on your fabric to trace your Parmentation (1). Draw the outline of the top of your pants (2). Your parment should measure 6 cm high. To obtain a harmonious curve on the bottom of it, you just need to score small points 6 cm from the top line (3) and draw the curve in hand (4).

12- Assemble your pieces in front and back on one of the sides of your pants with a 1 cm seam (1). Do the same operation for your parment.
13- Assemble your parment and your pants on the top line using the side seam as a benchmark to place your parmentation (2). Start and finish your seam 1.5 cm from the edge (3).

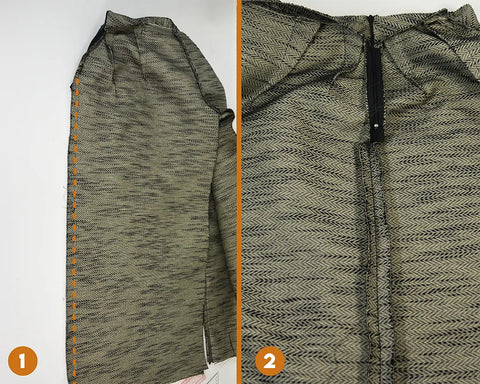
14- Pin your zipper to your pants by passing the top of it between the pants and the parmentation (1). Thanks to your pressing foot for invisible closure, seam at 1 cm (2). Once this seam was finished, I invite you to shock the top of this seam by cutting the top of the ribbon from your zipper (3). You can turn your seam and iron it in the right direction (4). Repeat the same operation for the other side.

15- Close your side seam with a seam at 1cm (1). Iron your two seams open (open sides (2).
16- You can fix your part inward with small points by hand at the pliers and seams (3). All you have to do is sew your hems. I chose for this tutorial to make a point by hand to have a better quality result. If you want to make these hems to the machine, I refer you to our article Short Dauphine Who explains to you how to make them.
And as usual I offer you a little outdoor photo shoot, as well as a video of this pretty Bob Vendôme.


1 comment
Ravie de ma première commande!!! Le coupon étant bien coupé droit pas de mauvaise surprise avec un manque de tissu lors de la réalisation.
La secrétaire a prit la peine de me rappeler pour me prévenir de la livraison. Très pro je l’a remercie de son efficacité.