Dauphine -wide shorts
For beach edges and campaign walks why not create a brand new shorts! So I know, how to make the creation of shorts easy and without spending hours there? Well I have good thoughtful And I offer you a simple tutorial and especially without boss, which should Make you want to create more pants and shorts. I therefore present to you the wide runner -up shorts, it is certainly wide but the adjusted belt allows you to create a flattering silhouette that will know Use you.
I decided to make this one in Cretonne because in general when we talk about clothes summer, Cretonne remains a safe bet. It is a light and flexible fabric that keeps good opacity and good hold. In addition, this Cretonne is a 100% cotton This which allows good breathing in his clothes.
Supplies :
- 2m x 1m50 of cretonne Bordeaux, 3 meters at 12 €
- A box of pins
- A wire matching
- A tailor
- A Measuremer meter
- A rule / square
- A sewing machine
- Pants / shorts from your own wardrobe
- A rubber band 2 or 5cm (depending on your tastes in terms of bending)

Before you start, you will need, for this tutorial, to know your pool tour and your waist. To take these measurements, simply, using your measurer meter, to go around the widest line in your pool and go around your waist.
Step 1: Draw and cut the pieces
Legs
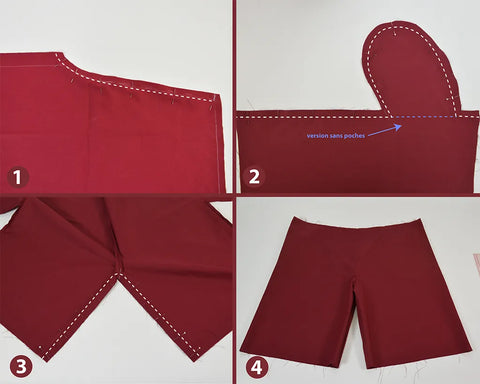
1- On your coupon folded in half in the edge of the edge, place one of your pants or shorts folded in half (1). Align the top of the line HAS at the edge of your fabric. Then at the bottom of this line, draw a straight line parallel to the fold or the edge of your fabric (2).
2- To trace the side line, perpendicular to the edge of your fabric Measure the quarter of your basin tower + 6cm and mark where this measurement is located (to find your way, in general the basin line is 10cm under the pocket). Place this measurement from the line HAS. Then draw a new parallel to the edge of the fabric using this point as a benchmark (3).
3- If you want this shorts to be high waist (as I currently realize), I invite you to extend line A to make it measure 30cm (4). Then draw a line at right angle from line A to reach the side line.

4- The length of your shorts will depend on your size, so I advise you to measure from your size the desired length for your shorts. My model measuring 1m67 I decided that my shorts would be 50cm long. Draw this measurement on your side line starting from the waist and draw your hem perpendicular with your side line and add 4cm that will correspond to the hem.
The pocket
The next step is optional if you do not want to make pockets in your shorts. In this case I find you in step 6.
5- After drawing your shorts, draw a marker 4cm from the top, it determines the start of your pocket (1). The opening of your integrated pocket should be at least 15 cm so that it is easy to slip your hand (2). When you draw your pocket, use your hand as a measurement tool, trace around it (about 2cm), and above all orient your hand down so that the pocket goes in the right direction (3).

6- Once all these changes are made, you just have to cut this shape 4 times by using the first as a boss. Leave 1cm of sewing all around your pattern when you cut.
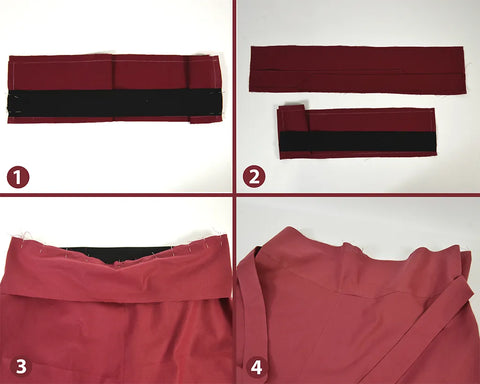
The belt
7- For the belt cut two rectangles measuring your divided pelvis tower in length/2 + 6cm, and measuring in width 10cm because we will pound them in half when the belt is installed. Leave 1cm of sewing around your rectangles when you cut.
8- For bands that will be used to adjust the front of the shorts, cut two bands of the shape below (1). This measures in length 1/4 of the waist tour + 8cm and 8cm in width. These bands will be to be folded in two when mounting the shorts. You can if you wish to make a bevel at the end of it the size you want. To do it on one of the sides measure 5cm and join this points at the end of the belt (2 and 3). Leave 1cm of sewing around your pieces when you cut.

9- Cut your elastic band to measure your size divided by 2, plus 4cm that will serve as ease and sewing value.
At the end of this stage you should end up with 8 songs.
Finally you have overcome the layout we will be able to go to the assembly.
Step 2: The assembly
I also invite you to overcome or make a zigzag point all around your pieces of fabrics.
10- Start by sewing the lines together HAS from the front and back to 1cm (1). Then assemble the seams 1cm from the edge (2). And finally you just have to sew the interior of the leg (3).
11- Return your pockets and iron them so that they remain oriented inward (4).
12- Now take the bands that will be used to adjust the front of the shorts. Fold them in half and sew it (1). You can offset the seams by shortening one of them (2). Turn over the set and go back to flatten it. You can then fix these two strips on the outer part of your belt in front of 1.5cm from the edge. All you have to do is sew them 0.7cm from the edge which generally corresponds to the width of the pressing foot of your sewing machine (3). You should end up with this result (4).

13- For your back belt first attach the elastic band first on the small sides 1cm from the edge (1). Then assemble your belt in front and your back belt place against the place (2). You can if you wish to offset the elastic at the seam and then iron it lying.
14- Now it's time to fix the belt to your shorts. Pin the edge of your belt to your shorts, place against the basis, and seam at 1cm (3). Then put your piece back in the right direction and iron the seams upwards (4).
15- Then lower the belt inside so that it measures 5cm to the outside (1). Then on the outside redo a seam on that which assembled the belt and the shorts to close it (2). (For more cleanliness you can fold down the sewing value inwards so that the belt is completely closed, but as you have said easy shorts I did easy!) You just have to make your hem out of stitching. Fold your hem value (4cm) and make a first stitching 3cm from the edge (3). Then make a second stitching 0.7cm from the first (4), this gives a well -finished appearance to your hem.

And here you have survived the realization of your first short without boss! I can't wait to see the shorts you are going to make so do not hesitate to share them on social networks with the hashtags #Shortdauphine and #lecouonsdesaintpierre.
And now some photos of the final result carried by our model, with Sun and fine sand option please.


You can wear it rolled up or not according to your desires.
